
What can we help you with?
Putting Greens
Basic Installation Method Putting Green
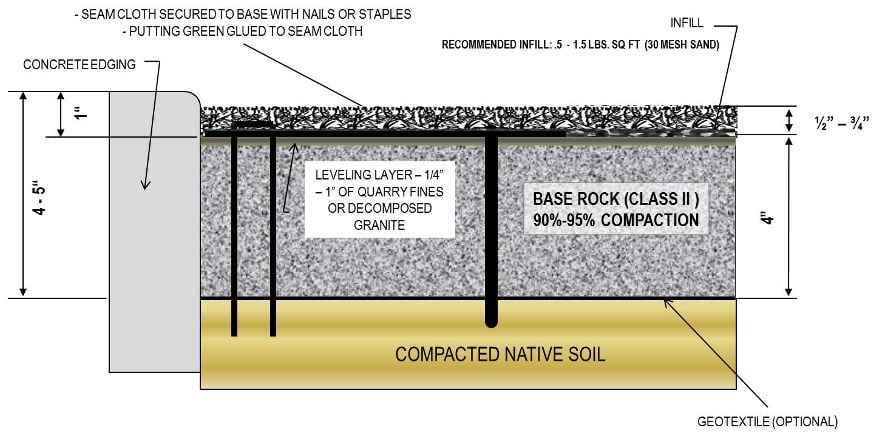 This putting green is being installed next to a hard concrete edge.
- Excavate 3-5 inches of the native soil; an optional weed barrier may be laid down on top of the excavated area.
- Fill in 4 inches with a crushed rock base, compacted to 90%-95% compaction, leaving 1 inch before reaching the height of the concrete edge. Lay 1/4 inch of decomposed granite on top of the crushed rock base and make sure to compact this evenly.
- Around the outer perimeter, attach seam tape to the sub-base with 5 inch, non-galvanized nails every foot.
- Glue the putting green onto the seam tape and secure with 5 inch, non-galvanized nails every 3-6 inches around the perimeter and use 1 inch, non-galvanized staples every 3 square feet in the interior.
- Now that the grass is laid out flat and attached, evenly spread .5 – 1.5 pound(s) of infill per square foot, raking it into the thatch of the turf.
Basic Installation Method Putting Green with Fringe
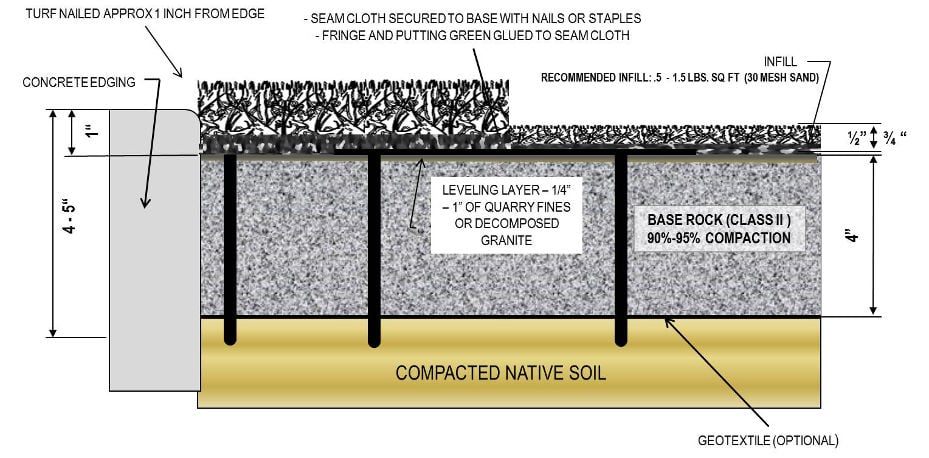 This putting green is installed next to a hard concrete edge with fringe.
- Excavate 3-5 inches of the native soil; an optional weed barrier may be laid down on top of the excavated area.
- Fill in 4 inches with a crushed rock base, compacted to 90%-95% compaction, leaving 1 inch before reaching the height of the concrete edge.
- Lay 1/4 inch of decomposed granite on top of the crushed rock base and make sure to compact this evenly.
- Along the seam between the fringe and the putting green, attach seam tape to the sub-base with 5 inch non-galvanized nails every foot.
- Glue the putting green and fringe onto the seam tape and secure with 5 inch, non-galvanized nails on the fringe side of the seam and 1 inch, non-galvanized staples on the putting green side.
- Secure the fringe with 5 inch nails every 3-6 inches around the perimeter at approximately 1 inch away from the concrete edge as well as 1 inch staples every 3 square feet in the interior putting green.
Premium Installation Method Putting Green
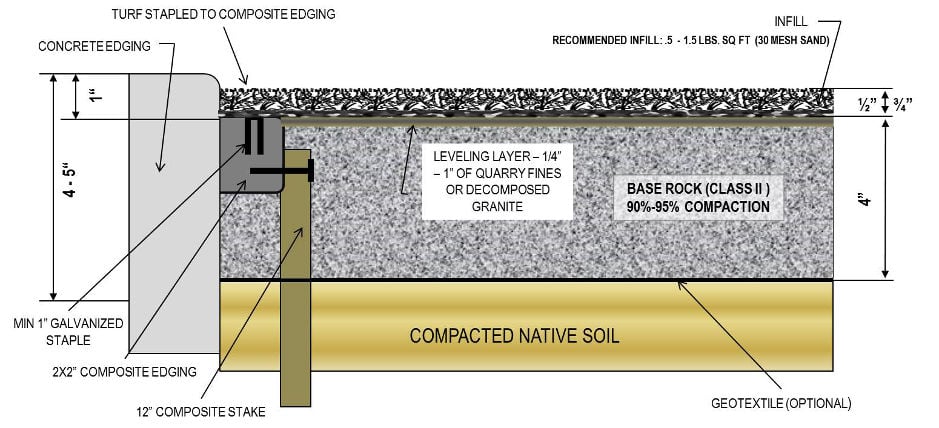
This putting green is being installed next to a hard concrete edge using a bend-a-board.
- Excavate 3-5 inches of the native soil; an optional weed barrier may be laid down on top of the excavated area.
- Fill in 2 inches with a crushed rock base, compacted to 90%-95% compaction, leaving about 3 inches before reaching the height of the concrete edge.
- Lay the bend-a- board around the entire perimeter. The bend-a- board is held in place with 12 inch composite stakes, five stakes per bend-a- board, held together by nailing or screwing the stake into the bend-a- board.
- Fill in all but 1/4 inch of the remaining area up to the top of the bend-a- board with crushed rock base.
- Lay 1/4 inch of decomposed granite on top of the crushed rock base and make sure to compact this evenly, this will be flush with the top of the bend-a- board.
- Around the outer perimeter, attach seam tape to the sub-base with 1 inch non-galvanized staples into the bend-a- board every foot.
- Glue the putting green onto the seam tape and secure with 1 inch, non-galvanized staples every 3-6 inches around the perimeter and every 3 square feet in the interior.
- Now that the grass is laid out flat and attached, evenly spread .5 – 1.5 pound(s) of infill per square foot, raking it into the thatch of the turf.
Premium Installation Method Putting Green with Fringe
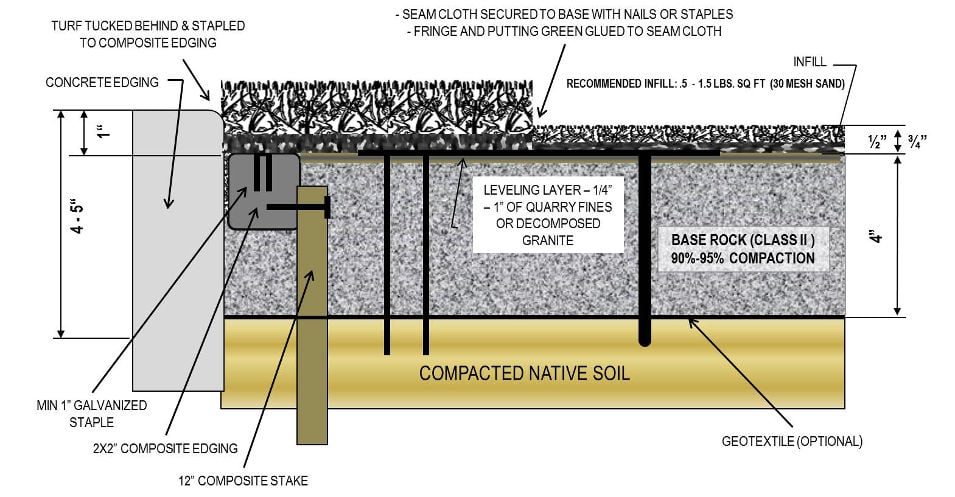
This putting green is being installed next to a concrete edge with a fringe as well as using a bend-a-board.
- Excavate 3-5 inches of the native soil; an optional weed barrier may be laid down on top of the excavated area.
- Fill in 2 inches with a crushed rock base, compacted to 90%-95% compaction, leaving about 3 inches before reaching the height of the concrete edge.
- Lay the bend-a-board around the entire perimeter leaving about 1/4 inch between the bend-a-board and concrete edge. The bend-a-board is held in place with 12 inch composite stakes, five stakes per bend-a-board, held together by nailing or screwing the stake into the bend-a-board.
- Fill the remaining area with crushed rock base within a 1/4 inch of the top of the bend-a-board.
- Lay 1/4 inch of decomposed granite on top of the crushed rock base and make sure to compact this evenly, this will be flush with the top of the bend-a-board.
- Along the seam between the fringe and the putting green, attach seam tape to the sub-base with 5 inch, non-galvanized nails every foot.
- Glue the putting green and fringe onto the seam tape and secure with 5 inch, non-galvanized nails on the fringe side of the seam and 1 inch, non-galvanized staples on the putting green side.
- Secure the fringe with 1 inch staples every 3-6 inches around the perimeter into the bend-a-board as well as every 3 square feet in the interior putting green.
- Now that the grass is laid out flat and attached, tuck the fringe into the 1/4 inch gap we left between the bend-a-board and the concrete edge. Then evenly spread .5 – 1.5 pound(s) of infill per square foot for the putting green and about 1-2 pounds of infill per square foot for the fringe, raking it into the thatch of the turf.
Installation Videos