
What can we help you with?
Landscapes
Basic Installation
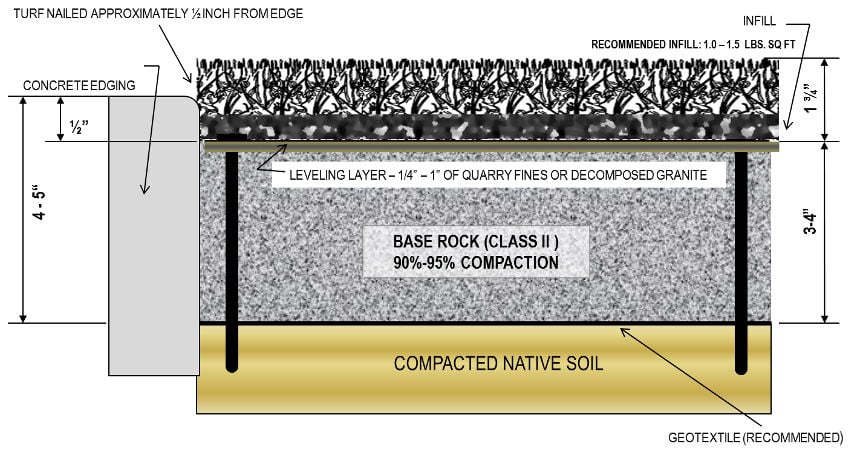
This grass is being installed next to a hard concrete edge.
- Excavate 3-5 inches of the native soil; an optional weed barrier may be laid down on top of the excavated area.
- Fill the excavated area with a crushed rock base to create a sub-base. The sub-base should be approximately 3-4 inches deep and compacted to 95% using a vibratory plate compactor. Leave a space of ¾ inch below the hardscape edge.
- Unroll grass and allow it to be exposed to sunlight for at least two hours. This will help the backing to become more pliable and for the grass blades to stand up straight.
- A weed barrier may be laid down on top of the sub-base. If adding a weed barrier, overlap the edges and nail into place using 5 inch, non-galvanized nails. Trim the edges to fit the project area.
- Now it’s time to install your grass. If your installation requires seaming, be sure to use seam tape and glue to attach the two pieces. Secure the seam into place with 5 inch, non-galvanized nails every 6 inches on both sides (staggered by 3 inches on either side) of the seam. Secure the turf by using 5 inch, non-galvanized nails every 3-6 inches around the perimeter, about 1/2 inch away from the hard concrete edge, as well as every 3 square feet within the interior.
- Now that the grass is laid out flat and attached, use a drop spreader to evenly spread 1-1.5 pound(s) of infill per square foot, raking it into the thatch of the turf.
Premium Installation
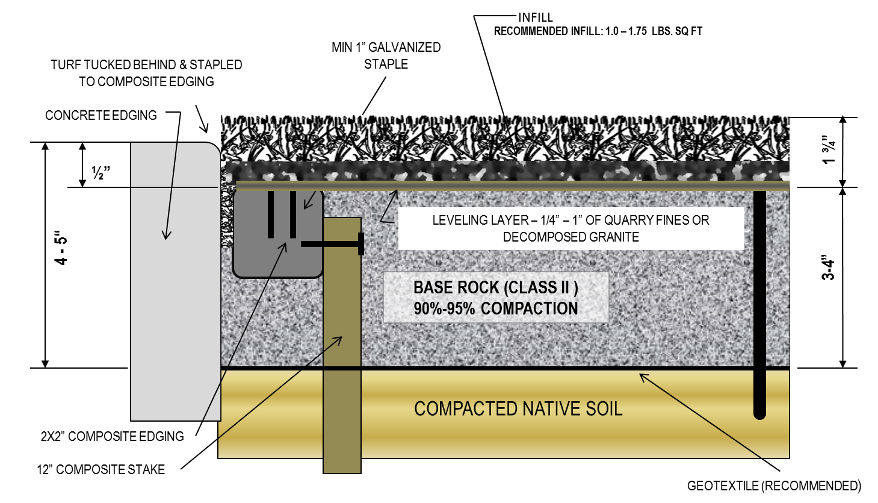
This grass is being installed next to a hard concrete edge using a bend-a-board.
- Excavate 3-5 inches of the native soil; an optional weed barrier may be laid down on top of the excavated area.
- Fill the excavated area with a crushed rock base to create a sub-base. The sub-base should be approximately 3-4 inches deep and compacted to 95% using a vibratory plate compactor. Leave a space of 2.5 inches below the hardscape edge. You will add more sub-base after installing bend-a-board.
- Unroll grass and allow it to be exposed to sunlight for at least two hours. This will help the backing to become more pliable and for the grass blades to stand up straight.
- Lay the bend-a-board around the entire perimeter, leaving about 1/4 inch between your concrete edge and the bend-a-board itself, and about 1/2 inch before reaching the height of the outer perimeter. The bend-a-board is held in place with 12 inch composite stakes, five stakes per bend-a-board, held together by nailing or screwing the stake into the bend-a-board.
- After the bend-a-board is in place, continue to evenly lay out the crushed rock base within the bend-a-board perimeter, leaving 1/4 inch before reaching the top of the bend-a-board, compacting this down as you go.
- Use about 1/4 inch of decomposed granite to level the area, be sure to compact this evenly. Your sub-base and the bend-a-board should now be flush, about 1/2 inch below the hard concrete edge.
- A weed barrier may be laid down on top of the sub-base. If adding a weed barrier, overlap the edges and nail into place using 5 inch, non-galvanized nails. Trim the edges to fit the project area.
- Now it’s time to install your grass. If your installation requires seaming, be sure to use seam tape and glue to attach the two pieces. Secure the seam into place with 5 inch, non-galvanized nails every 6 inches on both sides (staggered by 3 inches on either side) of the seam. Secure the turf by using 5 inch, non-galvanized nails every 3-6 inches around the perimeter, about 1/2 inch away from the hard concrete edge, as well as every 3 square feet within the interior.
- Now that the grass is laid out flat and attached, use a drop spreader to evenly spread 1-2 pound(s) of infill per square foot, raking it into the thatch of the turf.
Installation Video